Elizabeth’s Percentage System
Elizabeth Zimmermann, timeless knitting guru, is the founder of a series of equations related to sweater construction. She refers to these mathematical ratios as Elizabeth’s Percentage System or EPS. The system asserts that the ratios between elements of a well-fitted sweater are proportional and can be used to create ideal garments time and again. The basics of her “unvention” are explained below.
The percentage system is based on two general sweater shapes: the yoke and the drop shoulder. In the yoke style, the body is knit in the round to the underarms, as are the sleeves, and all three are joined to work the shoulders and neck in the round. Any number of different finishes can be executed once the body and sleeves are united including raglan, yoke, saddle shoulder and others. The drop shoulder style is worked in the round all the way to the neck with steeks used for the armholes or divided at the armholes and worked back and forth to the neck. The sleeves are joined afterward.
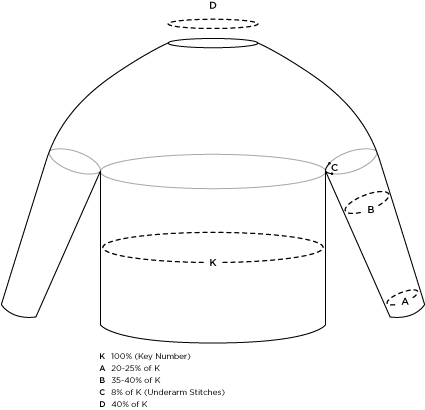
All calculations are based on the number represented by the variable K. K is your “key number” and stands for the number of stitches around the largest part of the body of the garment. You can figure out this value by multiplying your number of stitches per inch (gauge) by the circumference of the garment in inches. For example, a garment knit at 5 stitches per inch that is 50 inches around would result in K = 250. All further variables are gleaned from this initial number.
There are many wonderful things about this system. You can use it to calculate the dimensions of your favorite sweater in order to recreate the fit in a new sweater. You can also adjust the formulas to reflect the current fashion trends in terms of sleeves and fit. Create a snugger silhouette by reducing the percentage of stitches in the wrist and upper arm of the sleeve, create a boat neck by increasing the number of stitches at the neck, increase with greater or lesser frequency to change the overall shape of the sleeve. The possibilities are endless, as they often are with Zimmermann’s teachings.
First let us take a look at the yoke version of the percentage system. Let’s continue with the example we started above. The value of K was 250 stitches. Therefore, the value of the other variables would be as follows: A = 50 to 62 stitches, B = 88 to 100 stitches, C = 20 to 25 stitches and D = 100 stitches. “A” are the wrist stitches. To achieve the requisite stitches at the underarm (B), you could increase evenly over the length of the sleeve, or you could increase rapidly to create more drastic shaping. It’s really up to you! You will notice that C appears 4 times, once on each sleeve and once on either side of the body. These are the stitches that are placed on hold as the top of the garment is finished. They will be woven together later.

Next, consider the drop shoulder version of the example sweater. Again, we will use K = 250 stitches. Therefore, the value of the other variables would be as follows: A = 50 to 62 stitches, B = 112 to 125 stitches and D = 82 to 100 stitches. You will notice on this sweater that the upper arm is quite roomy at up to half the size of the body. This sweater will have a looser, more sweatshirt-like feel to it.

Depending upon the type of neckline you choose, the number of stitches you need for D may vary. You may choose to make a v-neck, Henley , or crew neck that is lower in the front by using a steek if you are knitting in the round, or incorporating the shaping if you are knitting the body back and forth above the bottom of the armhole.
IMPORTANT: These are merely guidelines and sample measurements. Experiment on your own with measurements from your favorite store-bought or previously knit sweaters. Or, measure the given areas on the person you are knitting for to customize a sweater as a gift. Be creative! Elizabeth Zimmermann is all about giving you the power to customize your own knitted garment!
Percentages are taken from “The Opinionated Knitter: Elizabeth Zimmerman Newsletters 1958-1968“, pg 14-15.
EXAMPLE
|
- Step one is a swatch. Cast on 30 stitches on a circular needle and knit 20 rows then bind off loosely. Calculate the gauge over 4" and then per inch. This is the number of stitches per inch for this yarn on these needles for you. eg 3.5 stitches per inch.
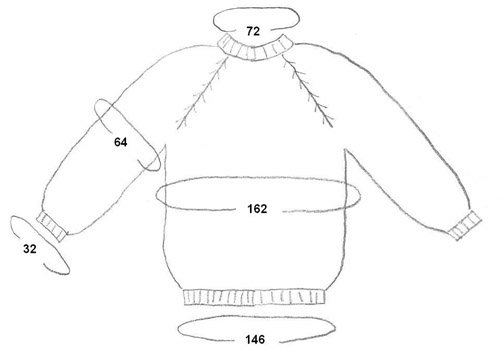
- Measure your chest eg 46". Therefore, 46 x 3.5 sts = 161 sts (round up to 162 sts). This number of stitches is used to determine all the other percentages in the jumper.
- 162 x 90% = 145.8 (round up to 146 sts) for the lower hem (the cast-on)
- 162 x 20% = 32.4 (round down to 32) for the hem of the sleeve
- 162 x 40% = 64.8 (round down to 64) for the bicep
- 162 x 45% = 72.9 (round down to 72) for the necck

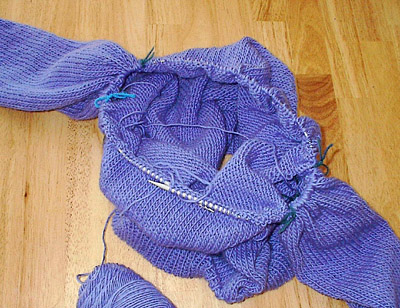
Cast on 146 stitches and knit a couple inches of ribbing. Increase 16 stitches to 162 stitches evenly across the row, (ie knit 9, make 1) and knit the body up to the underarms. Length is a matter of personal taste, usually about16 inches. Put the body aside, just leave it for now with all the stitches live on a needle, and knit the two sleeves: Cast on 32 stitches, knit in ribbing for a couple inches, then at the underarm, increase 2 stitches every 3 or 4 rows until you have 64 stitches (that's 40%), and knit until you like the length. Knit a duplicate sleeve for the other side. To avoid the embarrassing cliché of a sweater with sleeves two different lengths, make sure you've got the exact number of rows in each sleeve (hint: row counter). At this point, we have three separate pieces of knitting. One body and two sleeves. Put 8% x 162 = 13 stitches on stitch holders at the underarms, both on the body and the sleeves. On the body, that would mean you'd have 68 stitches for the front of the body, 13 stitches at the armpit on a holder, 68 stitches for the back of the body, and 13 stitches at the other armpit on a holder. (68+13+68+13=162 ) Subtract the armpit stitches -- 26 total -- then divide what is left by 2, to get front and back.) MAKE SURE THE ARMPITS ARE OPPOSITE EACH OTHER. That's the only thing you can potentially screw up on this stage. Put 13 armpit stitches at the underarm of each sleeve on holders, leaving you 51 active stitches per sleeve. Put the sleeves and body on one circular needle, with everything aligned as it would be on the body: sleeve, body front or back, sleeve, other half of body, other sleeve. (I do this by just knitting it all onto the needle -- I knit my way across the back, knit on the stitches of the sleeve, knit across the front, and knit on the stitches for the other sleeve.) You should now have 238 stitches on your needle: 68 back stitches, 51 sleeve stitches, 68 front stitches, 51 sleeve stitches = 238 stitches total. Make sure there are stitch markers at the four places where sleeve and body meet. (Those are known as armpit corners at my house.) 
The hard part is done. In fact, making sure your sleeves are on opposite sides of your body is about the only hard part to this method of knitting. Knit an inch or two plain. The more you knit plain, the deeper the arm holes will be. Up to you. Once you've got your arm holes deep enough, begin the raglan decreasing. Decrease TWO STITCHES at EACH MARKER, EVERY OTHER ROW. The decrease used on my sweater was slip-slip knit, move marker, knit 2 together. You could alternately use slip 1, knit 2 together, pass the slipped stitch over, or, heck, any double decrease or pair of decreases, so long as you get the numbers right. That means you do a row where you decrease 8 stitches (2 at each of 4 markers), then a row plain. Then another decrease row, then another plain row...that's it. Decrease until you get to about 72 stitches (162 x 45% = 72.9 stitches), knit an inch or so of ribbing, and bind off. If you want, you can put in a short row or two across the back of the neck to make it fit better, but it's not vital. All you've got left to do is graft together your armpits. That's all the finishing there is; no real seams. Congratulations. You've just made up your very own pattern. Now go do another one, but put in colors, or a cable, or something. Anyone who said "I can't do that" is grounded! |
|
|
|


