Showing posts with label Fit. Show all posts

Saturday, September 10, 2022

Elizabeth Zimmerman's Percentage System

Elizabeth’s Percentage System

Elizabeth Zimmermann, timeless knitting guru, is the founder of a series of equations related to sweater construction. She refers to these mathematical ratios as Elizabeth’s Percentage System or EPS. The system asserts that the ratios between elements of a well-fitted sweater are proportional and can be used to create ideal garments time and again. The basics of her “unvention” are explained below.

The percentage system is based on two general sweater shapes: the yoke and the drop shoulder. In the yoke style, the body is knit in the round to the underarms, as are the sleeves, and all three are joined to work the shoulders and neck in the round. Any number of different finishes can be executed once the body and sleeves are united including raglan, yoke, saddle shoulder and others. The drop shoulder style is worked in the round all the way to the neck with steeks used for the armholes or divided at the armholes and worked back and forth to the neck. The sleeves are joined afterward.

All calculations are based on the number represented by the variable K. K is your “key number” and stands for the number of stitches around the largest part of the body of the garment. You can figure out this value by multiplying your number of stitches per inch (gauge) by the circumference of the garment in inches. For example, a garment knit at 5 stitches per inch that is 50 inches around would result in K = 250. All further variables are gleaned from this initial number.

There are many wonderful things about this system. You can use it to calculate the dimensions of your favorite sweater in order to recreate the fit in a new sweater. You can also adjust the formulas to reflect the current fashion trends in terms of sleeves and fit. Create a snugger silhouette by reducing the percentage of stitches in the wrist and upper arm of the sleeve, create a boat neck by increasing the number of stitches at the neck, increase with greater or lesser frequency to change the overall shape of the sleeve. The possibilities are endless, as they often are with Zimmermann’s teachings.

First let us take a look at the yoke version of the percentage system. Let’s continue with the example we started above. The value of K was 250 stitches. Therefore, the value of the other variables would be as follows: A = 50 to 62 stitches, B = 88 to 100 stitches, C = 20 to 25 stitches and D = 100 stitches. “A” are the wrist stitches. To achieve the requisite stitches at the underarm (B), you could increase evenly over the length of the sleeve, or you could increase rapidly to create more drastic shaping. It’s really up to you! You will notice that C appears 4 times, once on each sleeve and once on either side of the body. These are the stitches that are placed on hold as the top of the garment is finished. They will be woven together later.


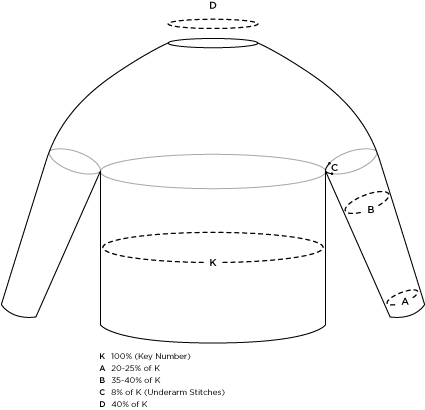
Next, consider the drop shoulder version of the example sweater. Again, we will use K = 250 stitches. Therefore, the value of the other variables would be as follows: A = 50 to 62 stitches, B = 112 to 125 stitches and D = 82 to 100 stitches. You will notice on this sweater that the upper arm is quite roomy at up to half the size of the body. This sweater will have a looser, more sweatshirt-like feel to it.

Depending upon the type of neckline you choose, the number of stitches you need for D may vary. You may choose to make a v-neck, Henley , or crew neck that is lower in the front by using a steek if you are knitting in the round, or incorporating the shaping if you are knitting the body back and forth above the bottom of the armhole.

IMPORTANT: These are merely guidelines and sample measurements. Experiment on your own with measurements from your favorite store-bought or previously knit sweaters. Or, measure the given areas on the person you are knitting for to customize a sweater as a gift. Be creative! Elizabeth Zimmermann is all about giving you the power to customize your own knitted garment!

Percentages are taken from “The Opinionated Knitter: Elizabeth Zimmerman Newsletters 1958-1968“, pg 14-15.
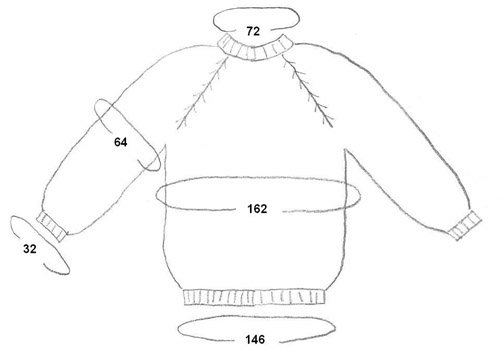

EXAMPLE

  1. Step one is a swatch. Cast on 30 stitches on a circular needle and knit 20 rows then bind off loosely. Calculate the gauge over 4" and then per inch. This is the number of stitches per inch for this yarn on these needles for you. eg 3.5 stitches per inch.
  2. Measure your chest eg 46". Therefore, 46 x 3.5 sts = 161 sts (round up to 162 sts). This number of stitches is used to determine all the other percentages in the jumper.
  3. 162 x 90% = 145.8 (round up to 146 sts) for the lower hem (the cast-on)
  4. 162 x 20% = 32.4 (round down to 32) for the hem of the sleeve
  5. 162 x 40% = 64.8 (round down to 64) for the bicep
  6. 162 x 45% = 72.9 (round down to 72) for the necck


Cast on 146 stitches and knit a couple inches of ribbing. Increase 16 stitches to 162 stitches evenly across the row, (ie knit 9, make 1) and knit the body up to the underarms. Length is a matter of personal taste, usually about16 inches. Put the body aside, just leave it for now with all the stitches live on a needle, and knit the two sleeves: Cast on 32 stitches, knit in ribbing for a couple inches, then at the underarm, increase 2 stitches every 3 or 4 rows until you have 64 stitches (that's 40%), and knit until you like the length. Knit a duplicate sleeve for the other side. To avoid the embarrassing cliché of a sweater with sleeves two different lengths, make sure you've got the exact number of rows in each sleeve (hint: row counter).

At this point, we have three separate pieces of knitting. One body and two sleeves. 

Put 8% x 162 = 13 stitches on stitch holders at the underarms, both on the body and the sleeves. On the body, that would mean you'd have 68 stitches for the front of the body, 13 stitches at the armpit on a holder, 68 stitches for the back of the body, and 13 stitches at the other armpit on a holder. (68+13+68+13=162 ) Subtract the armpit stitches -- 26 total -- then divide what is left by 2, to get front and back.) MAKE SURE THE ARMPITS ARE OPPOSITE EACH OTHER. That's the only thing you can potentially screw up on this stage. Put 13 armpit stitches at the underarm of each sleeve on holders, leaving you 51 active stitches per sleeve. 

Put the sleeves and body on one circular needle, with everything aligned as it would be on the body: sleeve, body front or back, sleeve, other half of body, other sleeve. (I do this by just knitting it all onto the needle -- I knit my way across the back, knit on the stitches of the sleeve, knit across the front, and knit on the stitches for the other sleeve.) You should now have 238 stitches on your needle: 68 back stitches, 51 sleeve stitches, 68 front stitches, 51 sleeve stitches = 238 stitches total. Make sure there are stitch markers at the four places where sleeve and body meet. (Those are known as armpit corners at my house.) 

The hard part is done. In fact, making sure your sleeves are on opposite sides of your body is about the only hard part to this method of knitting. 

Knit an inch or two plain. The more you knit plain, the deeper the arm holes will be. Up to you. 

Once you've got your arm holes deep enough, begin the raglan decreasing. Decrease TWO STITCHES at EACH MARKER, EVERY OTHER ROW. The decrease used on my sweater was slip-slip knit, move marker, knit 2 together. You could alternately use slip 1, knit 2 together, pass the slipped stitch over, or, heck, any double decrease or pair of decreases, so long as you get the numbers right. That means you do a row where you decrease 8 stitches (2 at each of 4 markers), then a row plain. Then another decrease row, then another plain row...that's it. 

Decrease until you get to about 72 stitches (162 x 45% = 72.9 stitches), knit an inch or so of ribbing, and bind off. If you want, you can put in a short row or two across the back of the neck to make it fit better, but it's not vital. All you've got left to do is graft together your armpits. That's all the finishing there is; no real seams. 

Congratulations. You've just made up your very own pattern. Now go do another one, but put in colors, or a cable, or something. 

Anyone who said "I can't do that" is grounded!


ABOUT THE AUTHOR


Monday, September 5, 2022

Determining Fit and Gauge

Knit a gauge with the garment yarn and using a needle size that gives you the fabric that you like and that is fit for purpose eg very tight for wind resistant, loose for lacy, etc

Determine the number of stitches needed for your bust by knitting a gauge and then using the following formula:

stitches per inch (or cm) x desired finished inches (or cm) = total number of stitches required at the bust

So if my chosen yarn knit to 4.5 stitches per inch, and I was aiming for a finished chest measurement of 24″, then 4.5  x 24″ = 108 sts.

Determine which size to knit by looking at the pattern instructions and seeing which size has this number of stitches at the bust eg 108 sts.

If your stitch gauge (width) matches the bust of one size and the number of your row gauge (length) matches a second size, knit the size based on your stitch gauge (width) AND also knit to the lengths of the second size.

Knitting in the round and especially a Fair Isle pattern needs further calculation.

If the Fair Isle pattern is 25 rounds, first calculate how tall the pattern would be for the pattern's design gauge eg 5.5 sts and 7 rounds per inch.

This is calculated as:

number of rounds in the pattern / no of rounds per inch = height of the pattern in the pattern's design gauge

eg 25 rounds / 7 rounds per inch = 25 / 7 = 3.57″ tall at pattern's design gauge

Now you calculate how tall the pattern would be for your gauge eg 4.5 sts and 6 rounds per inch, so 25 rounds / 6 rounds per inch = 25 / 6 = 4.16" tall at your gauge.

So each Fair Isle section repeat would be taller in my gauge than the pattern gauge by 0.6″.  So where the pattern calls for knitting 4.5″ before starting the Fair Isle, knit to 3.75″ and then start the colour work. 

Throughout the rest of the pattern, I simply continued in the same vein, always using the ADJUSTED stitch count numbers (the second / 3-6 mo size), but where knit-to LENGTHS were mentioned, I used the instructions from the 2-4 yr size.

HOW TO CALCULATE the CAST ON STITCHES

STEP 1: FIND THE CAST ON LENGTH

The first step is to determine the length of your cast-on stitches by calculating a ratio to the number of stitches in the original pattern gauge divided by 4 inches to the number of cast-on stitches the pattern calls for divided by X or the length you’re trying to find. X = Cast on length the original pattern calls for.

Original Gauge sts / 4 in = CO sts / X in
X = CO sts (4)/Gauge sts

For example, if my original gauge was 10 STS per 4 inches and my cast on amount was 56 STS, I would determine the cast on length by completing the following equation:

X = 56(4)/10
X = 22.4 in

STEP 2: FIND NEW CAST ON STITCHES

Now that you know how long the cast-on stitches in the original pattern are, you can work backward and find how many stitches you’ll need to cast on in your new gauge to get that same cast on length.

New Gauge STS / 4 in = X STS / Cast On Length

X = New Gauge STS(Cast On Length)/4

For example, if my new gauge is 15 stitches per 4 inches and I wanted to determine how many stitches to cast on based on the length I just calculated of 22.4 in, I would complete the following equation:

X= 16(22.4)/4
X = 89.6 or I would round up to 90 stitches as my new cast on stitches

Example of Changing Gauge

Let’s say you have a top down raglan sweater pattern knit in a super bulky weight yarn on10mm needles (pattern gauge is 9 stitches and 13 rows per 4 in/10 cm) that you want to convert to worsted weight yarn on 5mm needles (new gauge is 16 stitches and 24 rows per 4 in/10 cm)

  1. Figure out the number of cast on stitches. If you originally cast on a total of 52 stitches with 6 stitches for each sleeve and 20 stitches for both the front and back, you’ll need to figure out the new number of cast on stitches using the calculation above for each sleeve and for the front and back (don’t use total stitches because you need to know where to place your markers). The sleeve stitches should now be 11 (you might want to convert this to an even number) and the front and back stitches are now 36.

  2. Determine how many stitches you’ll need at the divide. Convert the number of back stitches at the divide to your new gauge using the formula So if the pattern tells you you’re supposed to have 42 stitches for the back when you divide for the body, you’ll run that through the converter and find out you’ll now need about 75 stitches for the back (you’ll want to round up or down to an even number—let’s use 76).

  3. Determine how many raglan increases you need to make. You use the new number of back stitches (76) and subtract the number of back stitches you started with in our new gauge (36), which is 40 stitches. You now know that you’ve increased a total of 40 stitches from your cast on number. And because you make 2 increases per round or row you’ll want to divide 40 by 2, which is 20. You now know you need to make 20 raglan increase rows/rounds before you divide for the body.

Number of Back sts at divide - Number of Back sts at cast on = Number of sts Increased

Number of sts Increased / 2 = Number of raglan increases

Make sure your armhole depth is similar to the original pattern - you may have to add some knit rows without raglan increases to increase armhole depth and meet the original length gauge.

Ann Budd's Notes on how to adapt a pattern written for one gauge to another gauge

For example, let's say that a pattern calls for worsted-weight yarn at a gauge of 5 stitches per inch and you want to adapt it for 5 ply yarn at a gauge of 6.5 stitches per inch. Let's say that the pattern calls for casting on 98 stitches. How many stitches would you cast on to produce a piece the same width at your tighter gauge of 6.5 stitches to the inch?

1. The answer lies in a simple relationship of ratios:

Number of sts in pattern / Pattern stitch gauge = Number of sts at your gauge / Your stitch gauge

2. If we plug in the numbers, we have:

page1image23440096

98 / 5 Number of sts at your gauge / 6.5

page1image23445952

3. To solve for the unknown (Number of sts at your gauge), simply multiply both sides by your stitch gauge (6.5) ie 98 / 6.5 = Number of sts at your gauge / 5

4. Flip the two sides and solve for the unknown number of stitches:

page1image23466160

Number of sts at your stitch gauge = 98 x 6.5 / 5 = 637.5 / 5  = 127.4

page1image23472960

Round up or down, 127 or 128 (even numbers are easier)

For a short cut, use the following equation every time the pattern lists a number of stitches to determine the number of stitches to work at your gauge:

Number of sts at your gauge =

(Number of sts in pattern) x (Your stitch gauge) / Pattern stitch gauge

page1image23514224

For example, if the pattern said to bind off 30 stitches at the center neck, you’d bind off 39 stitches instead.

Number of sts at your stitch gauge =

30 x 6.5 / 5 = 39

page1image23530176

If you chose to work with an even number of stitches initially (128 stitches), you'd want to adjust this number to be an even number as well so that there would be the same number of stitches on each side of the neck. Keep in mind that it's your choice whether to adjust up to 40 stitches or down to 38 stitches – the difference of a stitch won't make a visible difference.

Tin Can Knits on How to Resize a Pattern for a Different Gauge

The pattern Flax Light has a stitch gauge of 24 stitches and a row gauge of 32 rows per 4”. But if knit in Fingering yarn I get a gauge of 26 stitches and 34 rows per 4". Now let’s say we want to knit a size Medium with a chest circumference of 37”. First we need to look at the number of stitches around the chest. Then we need to determine how many inches does one single stitch measure and multiply it by the number of stitches around the bust. To do so we need to divide 4” by the total numbers of stitches in our gauge. Those simple calculations will help us determine the new circumference around the bust.

Let’s begin with the original gauge. By diving 4” by 24 we obtain approximately 0.1667”. The original size 37” has 222 stitches around the bust. By multiplying 0.1667 by 222 we obtain 37” – which makes complete sense looking at the original dimensions of Flax light.

– Now let’s repeat those calculations with the new gauge. 
4/26 = 0.1538 x 222 = 34.15”. As expected we end up with a smaller chest circumference. To get a size 37” we will probably need to knit one or two sizes up. 
– The next size up – Medium to Large – has 234 stitches around the chest. 0.1538 x 234 = 36”. 
– The size Large has 258 stitches around the chest. 0.1538 x 258 = 39.7”

As you can see from those results we won’t be able to reach an exact size 37” . Depending on how much positive ease we need we will have to choose in between the new sizes 36” and 39”. 
Please note that in most cases your row count should be proportionally off to your stitch count. If that isn’t the case you will have to make some minor changes at the shoulder shaping so to insure that the depth of the armholes and the yoke have the correct dimensions.

Sometime adapting the gauge of your pattern will have a positive outcome as the new measurements will end up being a better fit than the original ones. It can also be a good technique to use if you want to knit with a different yarn weight than the one recommended on the pattern. I tend to always choose the swatch with the nicest drape rather than the one with the correct gauge and adapt my patterns from there. Of course that’s only a matter of personal preferences and it might be best to stick to the technique you feel most comfortable with.

Technique: Adding a Button Band to a Cardigan

From Fruity Knitting, how to construct vertical buttonholes in a button band. Pick up stitches along the cardigan front and knit just less t...