Sunday, October 23, 2022

Technique: Adding a Button Band to a Cardigan

From Fruity Knitting, how to construct vertical buttonholes in a button band. Pick up stitches along the cardigan front and knit just less than half the width of the button band. eg where the button band will end up 11 stitches wide, make the buttonholes at eg 5 rows. Being a bit closer to the body of the cardigan will make it more stable and not stretch out the button band edge so much.

When constructing buttonholes the traditional way, the first round is a series of bound-off stitches and the next row a series of (an equal number) of cast-on stitches. This technique is different.

Barbara Walter uses a 1-row buttonhole technique which is detailed here. It can be worked from either the RS or the WS of the knitting but looks neater when worked from the WS. 

For example, where we want the buttonhole to be 3 stitches long.

  1. Work the buttonhole in row 5 of the band with each buttonhole being 3 stitches wide.
  2. Work to the position of the buttonhole then bring yarn to the front, slip 1 stitch purlwise, bring yarn to the back, slip another stitch purlwise, then pass 1st slipstitch over the 2nd.
  3. Slip next stitch purlwise then PSSO. Repeat to the last stitch cast off, here it is 3
  4. Put the last stitch back onto the left needle. Turn work to the other side and hold yarn to the back.
  5. Cast on the number of stitches bound off + 1 (so here, cast on 3 + 1 = 4 stitches) using the Cable Cast-on method.
  6. Turn work to the other side and hold yarn to the back.
  7. Slip one stitch from the left needle to the right, and pass the last cast-on stitch over this stitch

Place the buttonhole closer to the body side of the band rather than the edge of the band for greater stability

Friday, September 23, 2022

Comparison of Short Row Techniques

Wrap and Turn Short rows

Good for loose gauge eg lace

Japanese Short Rows

Good for invisibility

German Short Rows

Neat. Better in a tight gauge.

Yarn-over Short Rows

Good for socks


Tuesday, September 20, 2022

Technique - I-cord Bind off

The I-cord bind-off creates a corded edge. It is typically created using 3 cast-on stitches but can be more or less to give a thicker or thinner cord.

Technique:

  1. Cast-on 3 stitches using the cable method
  2. Knit the first two stitches then slip then knit two together through the back loop = 3 stitches on the right needle
  3. Slip the 3 stitches on the right needle back onto the left needle and then repeat step 2 to the end
  4. Knit last two stitches together and weave in the end


Monday, September 12, 2022

Mending a Hole

This technique is courtesy of Andrea, Fruity Knitting. eg threadbare areas around a hole in the back of the heel of a sock. The aim is to knit a lattice that is larger than the area that will be appliqued over the hole.

Technique:

  1. Start the patch 2 - 3 stitches below the threadbare area and 2 - 3 rows wider than the area.
  2. Working from right to left, and using a dpn that is smaller than the needle size the sock was knitted on, pick up the right leg of all the stitches in the first row eg 19 stitches.
  3. Thread a darning needle with plenty of yarn and weave in the end, coming up through the middle of the stitch immediately to the right of the first stitch on the dpn.
  4. Knit across the dpn stitches with another dpn with yarn that is attached to a darning needle, from right to left. Secure at the end of the row by going down between the next stitches with the darning needle, under two bars and up, ready to purl back.
  5. Slip the first stitch of the row purl-wise and then purl back.
  6. Continue back and forth in this manner until the patch is complete and the sides have been secured, ending with a knit row.
  7. Turn the work around so that the patch is facing away from you, and with the spare dpn pick up the same number of stitches eg 19 from the sock immediately below the stitches on the dpn.
  8. Use Kitchener stitch to finish off the live stitches and weave in the yarn end.


Mending a Threadbare Area

 This technique is courtesy of Andrea, Fruity Knitting. eg the back of the heel of a sock, using duplicate stitch.

Technique:

  1. First, thread a large needle with the yarn and place the threadbare area over a darning egg.
  2. Start a couple of stitches below and a couple of rows to the right of the threadbare area - you need to start on a stable area
  3. Leaving a tail, weave a path to where you want the first stitch to lie.
  4. Go up through the middle of the first stitch then across through both legs of the first stitch from right to left (forms the right leg of the duplicate stitch) then back down through the middle of the stitch (forms the left leg of the duplicate stitch). Go up through the middle of the next stitch to the left and repeat, moving along the row from right to left
  5. Move up a row by going up through the middle of the stitch above and then continuing as before but going through the legs from left to right so that you can move along the row from left to right. It's easier to do this direction upside down.

Saturday, September 10, 2022

Elizabeth Zimmerman's Percentage System

Elizabeth’s Percentage System

Elizabeth Zimmermann, timeless knitting guru, is the founder of a series of equations related to sweater construction. She refers to these mathematical ratios as Elizabeth’s Percentage System or EPS. The system asserts that the ratios between elements of a well-fitted sweater are proportional and can be used to create ideal garments time and again. The basics of her “unvention” are explained below.

The percentage system is based on two general sweater shapes: the yoke and the drop shoulder. In the yoke style, the body is knit in the round to the underarms, as are the sleeves, and all three are joined to work the shoulders and neck in the round. Any number of different finishes can be executed once the body and sleeves are united including raglan, yoke, saddle shoulder and others. The drop shoulder style is worked in the round all the way to the neck with steeks used for the armholes or divided at the armholes and worked back and forth to the neck. The sleeves are joined afterward.

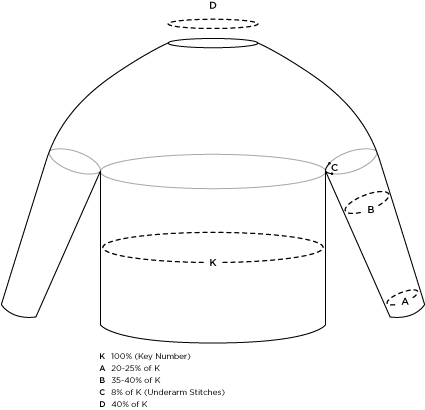
All calculations are based on the number represented by the variable K. K is your “key number” and stands for the number of stitches around the largest part of the body of the garment. You can figure out this value by multiplying your number of stitches per inch (gauge) by the circumference of the garment in inches. For example, a garment knit at 5 stitches per inch that is 50 inches around would result in K = 250. All further variables are gleaned from this initial number.

There are many wonderful things about this system. You can use it to calculate the dimensions of your favorite sweater in order to recreate the fit in a new sweater. You can also adjust the formulas to reflect the current fashion trends in terms of sleeves and fit. Create a snugger silhouette by reducing the percentage of stitches in the wrist and upper arm of the sleeve, create a boat neck by increasing the number of stitches at the neck, increase with greater or lesser frequency to change the overall shape of the sleeve. The possibilities are endless, as they often are with Zimmermann’s teachings.

First let us take a look at the yoke version of the percentage system. Let’s continue with the example we started above. The value of K was 250 stitches. Therefore, the value of the other variables would be as follows: A = 50 to 62 stitches, B = 88 to 100 stitches, C = 20 to 25 stitches and D = 100 stitches. “A” are the wrist stitches. To achieve the requisite stitches at the underarm (B), you could increase evenly over the length of the sleeve, or you could increase rapidly to create more drastic shaping. It’s really up to you! You will notice that C appears 4 times, once on each sleeve and once on either side of the body. These are the stitches that are placed on hold as the top of the garment is finished. They will be woven together later.


Next, consider the drop shoulder version of the example sweater. Again, we will use K = 250 stitches. Therefore, the value of the other variables would be as follows: A = 50 to 62 stitches, B = 112 to 125 stitches and D = 82 to 100 stitches. You will notice on this sweater that the upper arm is quite roomy at up to half the size of the body. This sweater will have a looser, more sweatshirt-like feel to it.

Depending upon the type of neckline you choose, the number of stitches you need for D may vary. You may choose to make a v-neck, Henley , or crew neck that is lower in the front by using a steek if you are knitting in the round, or incorporating the shaping if you are knitting the body back and forth above the bottom of the armhole.

IMPORTANT: These are merely guidelines and sample measurements. Experiment on your own with measurements from your favorite store-bought or previously knit sweaters. Or, measure the given areas on the person you are knitting for to customize a sweater as a gift. Be creative! Elizabeth Zimmermann is all about giving you the power to customize your own knitted garment!

Percentages are taken from “The Opinionated Knitter: Elizabeth Zimmerman Newsletters 1958-1968“, pg 14-15.


EXAMPLE

  1. Step one is a swatch. Cast on 30 stitches on a circular needle and knit 20 rows then bind off loosely. Calculate the gauge over 4" and then per inch. This is the number of stitches per inch for this yarn on these needles for you. eg 3.5 stitches per inch.
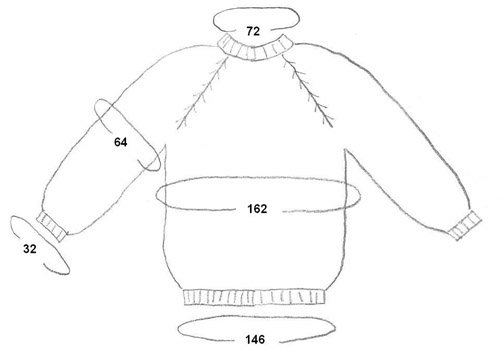
  2. Measure your chest eg 46". Therefore, 46 x 3.5 sts = 161 sts (round up to 162 sts). This number of stitches is used to determine all the other percentages in the jumper.
  3. 162 x 90% = 145.8 (round up to 146 sts) for the lower hem (the cast-on)
  4. 162 x 20% = 32.4 (round down to 32) for the hem of the sleeve
  5. 162 x 40% = 64.8 (round down to 64) for the bicep
  6. 162 x 45% = 72.9 (round down to 72) for the necck


Cast on 146 stitches and knit a couple inches of ribbing. Increase 16 stitches to 162 stitches evenly across the row, (ie knit 9, make 1) and knit the body up to the underarms. Length is a matter of personal taste, usually about16 inches. Put the body aside, just leave it for now with all the stitches live on a needle, and knit the two sleeves: Cast on 32 stitches, knit in ribbing for a couple inches, then at the underarm, increase 2 stitches every 3 or 4 rows until you have 64 stitches (that's 40%), and knit until you like the length. Knit a duplicate sleeve for the other side. To avoid the embarrassing cliché of a sweater with sleeves two different lengths, make sure you've got the exact number of rows in each sleeve (hint: row counter).

At this point, we have three separate pieces of knitting. One body and two sleeves. 

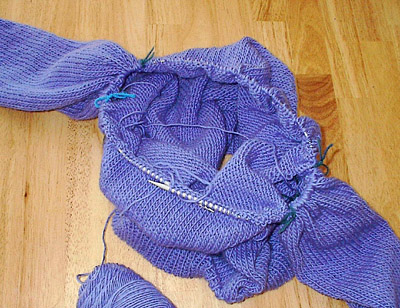
Put 8% x 162 = 13 stitches on stitch holders at the underarms, both on the body and the sleeves. On the body, that would mean you'd have 68 stitches for the front of the body, 13 stitches at the armpit on a holder, 68 stitches for the back of the body, and 13 stitches at the other armpit on a holder. (68+13+68+13=162 ) Subtract the armpit stitches -- 26 total -- then divide what is left by 2, to get front and back.) MAKE SURE THE ARMPITS ARE OPPOSITE EACH OTHER. That's the only thing you can potentially screw up on this stage. Put 13 armpit stitches at the underarm of each sleeve on holders, leaving you 51 active stitches per sleeve. 

Put the sleeves and body on one circular needle, with everything aligned as it would be on the body: sleeve, body front or back, sleeve, other half of body, other sleeve. (I do this by just knitting it all onto the needle -- I knit my way across the back, knit on the stitches of the sleeve, knit across the front, and knit on the stitches for the other sleeve.) You should now have 238 stitches on your needle: 68 back stitches, 51 sleeve stitches, 68 front stitches, 51 sleeve stitches = 238 stitches total. Make sure there are stitch markers at the four places where sleeve and body meet. (Those are known as armpit corners at my house.) 

The hard part is done. In fact, making sure your sleeves are on opposite sides of your body is about the only hard part to this method of knitting. 

Knit an inch or two plain. The more you knit plain, the deeper the arm holes will be. Up to you. 

Once you've got your arm holes deep enough, begin the raglan decreasing. Decrease TWO STITCHES at EACH MARKER, EVERY OTHER ROW. The decrease used on my sweater was slip-slip knit, move marker, knit 2 together. You could alternately use slip 1, knit 2 together, pass the slipped stitch over, or, heck, any double decrease or pair of decreases, so long as you get the numbers right. That means you do a row where you decrease 8 stitches (2 at each of 4 markers), then a row plain. Then another decrease row, then another plain row...that's it. 

Decrease until you get to about 72 stitches (162 x 45% = 72.9 stitches), knit an inch or so of ribbing, and bind off. If you want, you can put in a short row or two across the back of the neck to make it fit better, but it's not vital. All you've got left to do is graft together your armpits. That's all the finishing there is; no real seams. 

Congratulations. You've just made up your very own pattern. Now go do another one, but put in colors, or a cable, or something. 

Anyone who said "I can't do that" is grounded!


ABOUT THE AUTHOR


Monday, September 5, 2022

Determining Fit and Gauge

Knit a gauge with the garment yarn and using a needle size that gives you the fabric that you like and that is fit for purpose eg very tight for wind resistant, loose for lacy, etc

Determine the number of stitches needed for your bust by knitting a gauge and then using the following formula:

stitches per inch (or cm) x desired finished inches (or cm) = total number of stitches required at the bust

So if my chosen yarn knit to 4.5 stitches per inch, and I was aiming for a finished chest measurement of 24″, then 4.5  x 24″ = 108 sts.

Determine which size to knit by looking at the pattern instructions and seeing which size has this number of stitches at the bust eg 108 sts.

If your stitch gauge (width) matches the bust of one size and the number of your row gauge (length) matches a second size, knit the size based on your stitch gauge (width) AND also knit to the lengths of the second size.

Knitting in the round and especially a Fair Isle pattern needs further calculation.

If the Fair Isle pattern is 25 rounds, first calculate how tall the pattern would be for the pattern's design gauge eg 5.5 sts and 7 rounds per inch.

This is calculated as:

number of rounds in the pattern / no of rounds per inch = height of the pattern in the pattern's design gauge

eg 25 rounds / 7 rounds per inch = 25 / 7 = 3.57″ tall at pattern's design gauge

Now you calculate how tall the pattern would be for your gauge eg 4.5 sts and 6 rounds per inch, so 25 rounds / 6 rounds per inch = 25 / 6 = 4.16" tall at your gauge.

So each Fair Isle section repeat would be taller in my gauge than the pattern gauge by 0.6″.  So where the pattern calls for knitting 4.5″ before starting the Fair Isle, knit to 3.75″ and then start the colour work. 

Throughout the rest of the pattern, I simply continued in the same vein, always using the ADJUSTED stitch count numbers (the second / 3-6 mo size), but where knit-to LENGTHS were mentioned, I used the instructions from the 2-4 yr size.

HOW TO CALCULATE the CAST ON STITCHES

STEP 1: FIND THE CAST ON LENGTH

The first step is to determine the length of your cast-on stitches by calculating a ratio to the number of stitches in the original pattern gauge divided by 4 inches to the number of cast-on stitches the pattern calls for divided by X or the length you’re trying to find. X = Cast on length the original pattern calls for.

Original Gauge sts / 4 in = CO sts / X in
X = CO sts (4)/Gauge sts

For example, if my original gauge was 10 STS per 4 inches and my cast on amount was 56 STS, I would determine the cast on length by completing the following equation:

X = 56(4)/10
X = 22.4 in

STEP 2: FIND NEW CAST ON STITCHES

Now that you know how long the cast-on stitches in the original pattern are, you can work backward and find how many stitches you’ll need to cast on in your new gauge to get that same cast on length.

New Gauge STS / 4 in = X STS / Cast On Length

X = New Gauge STS(Cast On Length)/4

For example, if my new gauge is 15 stitches per 4 inches and I wanted to determine how many stitches to cast on based on the length I just calculated of 22.4 in, I would complete the following equation:

X= 16(22.4)/4
X = 89.6 or I would round up to 90 stitches as my new cast on stitches

Example of Changing Gauge

Let’s say you have a top down raglan sweater pattern knit in a super bulky weight yarn on10mm needles (pattern gauge is 9 stitches and 13 rows per 4 in/10 cm) that you want to convert to worsted weight yarn on 5mm needles (new gauge is 16 stitches and 24 rows per 4 in/10 cm)

  1. Figure out the number of cast on stitches. If you originally cast on a total of 52 stitches with 6 stitches for each sleeve and 20 stitches for both the front and back, you’ll need to figure out the new number of cast on stitches using the calculation above for each sleeve and for the front and back (don’t use total stitches because you need to know where to place your markers). The sleeve stitches should now be 11 (you might want to convert this to an even number) and the front and back stitches are now 36.

  2. Determine how many stitches you’ll need at the divide. Convert the number of back stitches at the divide to your new gauge using the formula So if the pattern tells you you’re supposed to have 42 stitches for the back when you divide for the body, you’ll run that through the converter and find out you’ll now need about 75 stitches for the back (you’ll want to round up or down to an even number—let’s use 76).

  3. Determine how many raglan increases you need to make. You use the new number of back stitches (76) and subtract the number of back stitches you started with in our new gauge (36), which is 40 stitches. You now know that you’ve increased a total of 40 stitches from your cast on number. And because you make 2 increases per round or row you’ll want to divide 40 by 2, which is 20. You now know you need to make 20 raglan increase rows/rounds before you divide for the body.

Number of Back sts at divide - Number of Back sts at cast on = Number of sts Increased

Number of sts Increased / 2 = Number of raglan increases

Make sure your armhole depth is similar to the original pattern - you may have to add some knit rows without raglan increases to increase armhole depth and meet the original length gauge.

Ann Budd's Notes on how to adapt a pattern written for one gauge to another gauge

For example, let's say that a pattern calls for worsted-weight yarn at a gauge of 5 stitches per inch and you want to adapt it for 5 ply yarn at a gauge of 6.5 stitches per inch. Let's say that the pattern calls for casting on 98 stitches. How many stitches would you cast on to produce a piece the same width at your tighter gauge of 6.5 stitches to the inch?

1. The answer lies in a simple relationship of ratios:

Number of sts in pattern / Pattern stitch gauge = Number of sts at your gauge / Your stitch gauge

2. If we plug in the numbers, we have:

page1image23440096

98 / 5 Number of sts at your gauge / 6.5

page1image23445952

3. To solve for the unknown (Number of sts at your gauge), simply multiply both sides by your stitch gauge (6.5) ie 98 / 6.5 = Number of sts at your gauge / 5

4. Flip the two sides and solve for the unknown number of stitches:

page1image23466160

Number of sts at your stitch gauge = 98 x 6.5 / 5 = 637.5 / 5  = 127.4

page1image23472960

Round up or down, 127 or 128 (even numbers are easier)

For a short cut, use the following equation every time the pattern lists a number of stitches to determine the number of stitches to work at your gauge:

Number of sts at your gauge =

(Number of sts in pattern) x (Your stitch gauge) / Pattern stitch gauge

page1image23514224

For example, if the pattern said to bind off 30 stitches at the center neck, you’d bind off 39 stitches instead.

Number of sts at your stitch gauge =

30 x 6.5 / 5 = 39

page1image23530176

If you chose to work with an even number of stitches initially (128 stitches), you'd want to adjust this number to be an even number as well so that there would be the same number of stitches on each side of the neck. Keep in mind that it's your choice whether to adjust up to 40 stitches or down to 38 stitches – the difference of a stitch won't make a visible difference.

Tin Can Knits on How to Resize a Pattern for a Different Gauge

The pattern Flax Light has a stitch gauge of 24 stitches and a row gauge of 32 rows per 4”. But if knit in Fingering yarn I get a gauge of 26 stitches and 34 rows per 4". Now let’s say we want to knit a size Medium with a chest circumference of 37”. First we need to look at the number of stitches around the chest. Then we need to determine how many inches does one single stitch measure and multiply it by the number of stitches around the bust. To do so we need to divide 4” by the total numbers of stitches in our gauge. Those simple calculations will help us determine the new circumference around the bust.

Let’s begin with the original gauge. By diving 4” by 24 we obtain approximately 0.1667”. The original size 37” has 222 stitches around the bust. By multiplying 0.1667 by 222 we obtain 37” – which makes complete sense looking at the original dimensions of Flax light.

– Now let’s repeat those calculations with the new gauge. 
4/26 = 0.1538 x 222 = 34.15”. As expected we end up with a smaller chest circumference. To get a size 37” we will probably need to knit one or two sizes up. 
– The next size up – Medium to Large – has 234 stitches around the chest. 0.1538 x 234 = 36”. 
– The size Large has 258 stitches around the chest. 0.1538 x 258 = 39.7”

As you can see from those results we won’t be able to reach an exact size 37” . Depending on how much positive ease we need we will have to choose in between the new sizes 36” and 39”. 
Please note that in most cases your row count should be proportionally off to your stitch count. If that isn’t the case you will have to make some minor changes at the shoulder shaping so to insure that the depth of the armholes and the yoke have the correct dimensions.

Sometime adapting the gauge of your pattern will have a positive outcome as the new measurements will end up being a better fit than the original ones. It can also be a good technique to use if you want to knit with a different yarn weight than the one recommended on the pattern. I tend to always choose the swatch with the nicest drape rather than the one with the correct gauge and adapt my patterns from there. Of course that’s only a matter of personal preferences and it might be best to stick to the technique you feel most comfortable with.

Technique - 3-needle Bind Off

This technique is often used to seam shoulders.

Technique:

Begin with two sets of live stitches, each on a needle (that’s 2 needles). Hold these needles next to each other, in your left hand.

Use a third needle (this is why it’s named ‘3-needle bind off’), and working yarn, to bind off and seam as follows:

  • Setup: Insert the right hand needle tip through the first stitch on the front needle AND the first stitch on the back needle, at the same time. Wrap the working yarn around at the back, then knit these two stitches together, slipping each of them off their left hand needle tip. One stitch is now on the right hand needle.
    • Step 1: Insert the right hand needle tip through the next stitch on the front needle AND the next stitch on the back needle. Knit these two stitches together, slipping both of them off the left hand needles. Two stitches are now on the right hand needle.
    • Step 2: Use your fingers, or one of the left hand needle tips, to lift the first stitch on the right hand needle over the second stitch, and drop it off the needle. One stitch has been bound off. One stitch remains on the right hand needle.
  • Repeat steps 1-2 until all the stitches on both needles have been bound off. One stitch remains on the right hand needle. Break the working yarn, and draw the end through the final live stitch, tightening it up. Weave end ends.

Tuesday, August 30, 2022

Technique - Inserting an Exposed Zipper into a Cardigan

 This technique is courtesy of Fruity Knitting.

Complete the front bands and block the cardigan. Choose a zipper that is 1/2cm shorter than the cardigan. 

Technique:

  1. Butt the front bands together and stab with lots of pins into a grid board to keep straight. Make sure any ribbing lines up
  2. Pin one side of the opened zipper in place with the teeth extending from band edge. Baste in place
  3. Pin and baste the other side of the (closed) zipper in place
  4. Check that the zipper works and that the bands lie flat and in position
  5. Sttich in place using hand stitching in regular thread one stitch in from the edge of the band OR sew with a machine for strength


Technique - Knitting Backwards

This technique is courtesy of Meg Swansen, daughter of Elizabeth Zimmerman. It saves having to turn your work when knitting back and forth. Some of these situations are:

- Short rows on the body of a sweater; especially on the yoke, where turning involves the entire bulk of a bottom-up sweater.

- Bobbles on an Aran sweater

- The heel flap on socks.

- Cables

- w Entrelac

Technique for Knitting Backwards:

  1. Insert L needle into the back leg of first stitch on R needle, coming into the stitch from the front
  2. Wrap yarn around L needle, anti-clockwise
  3. Lift stitch over and off
Technique for Purling Backwards:
  1. Bring the yarn to the front
  2. Insert L needle into the back leg of the first stitch on the R needle,  coming into the stitch from the back
  3. Wrap yarn around L needle, anti-clockwise
  4. Lift stitch over and off


Monday, August 29, 2022

Tip - Purl When You Can

This tip is courtesy of Meg Swansen, daughter of Elizabeth Zimmerman. It is used when you don't want a cuff but you want the colour work to go right to the edge.

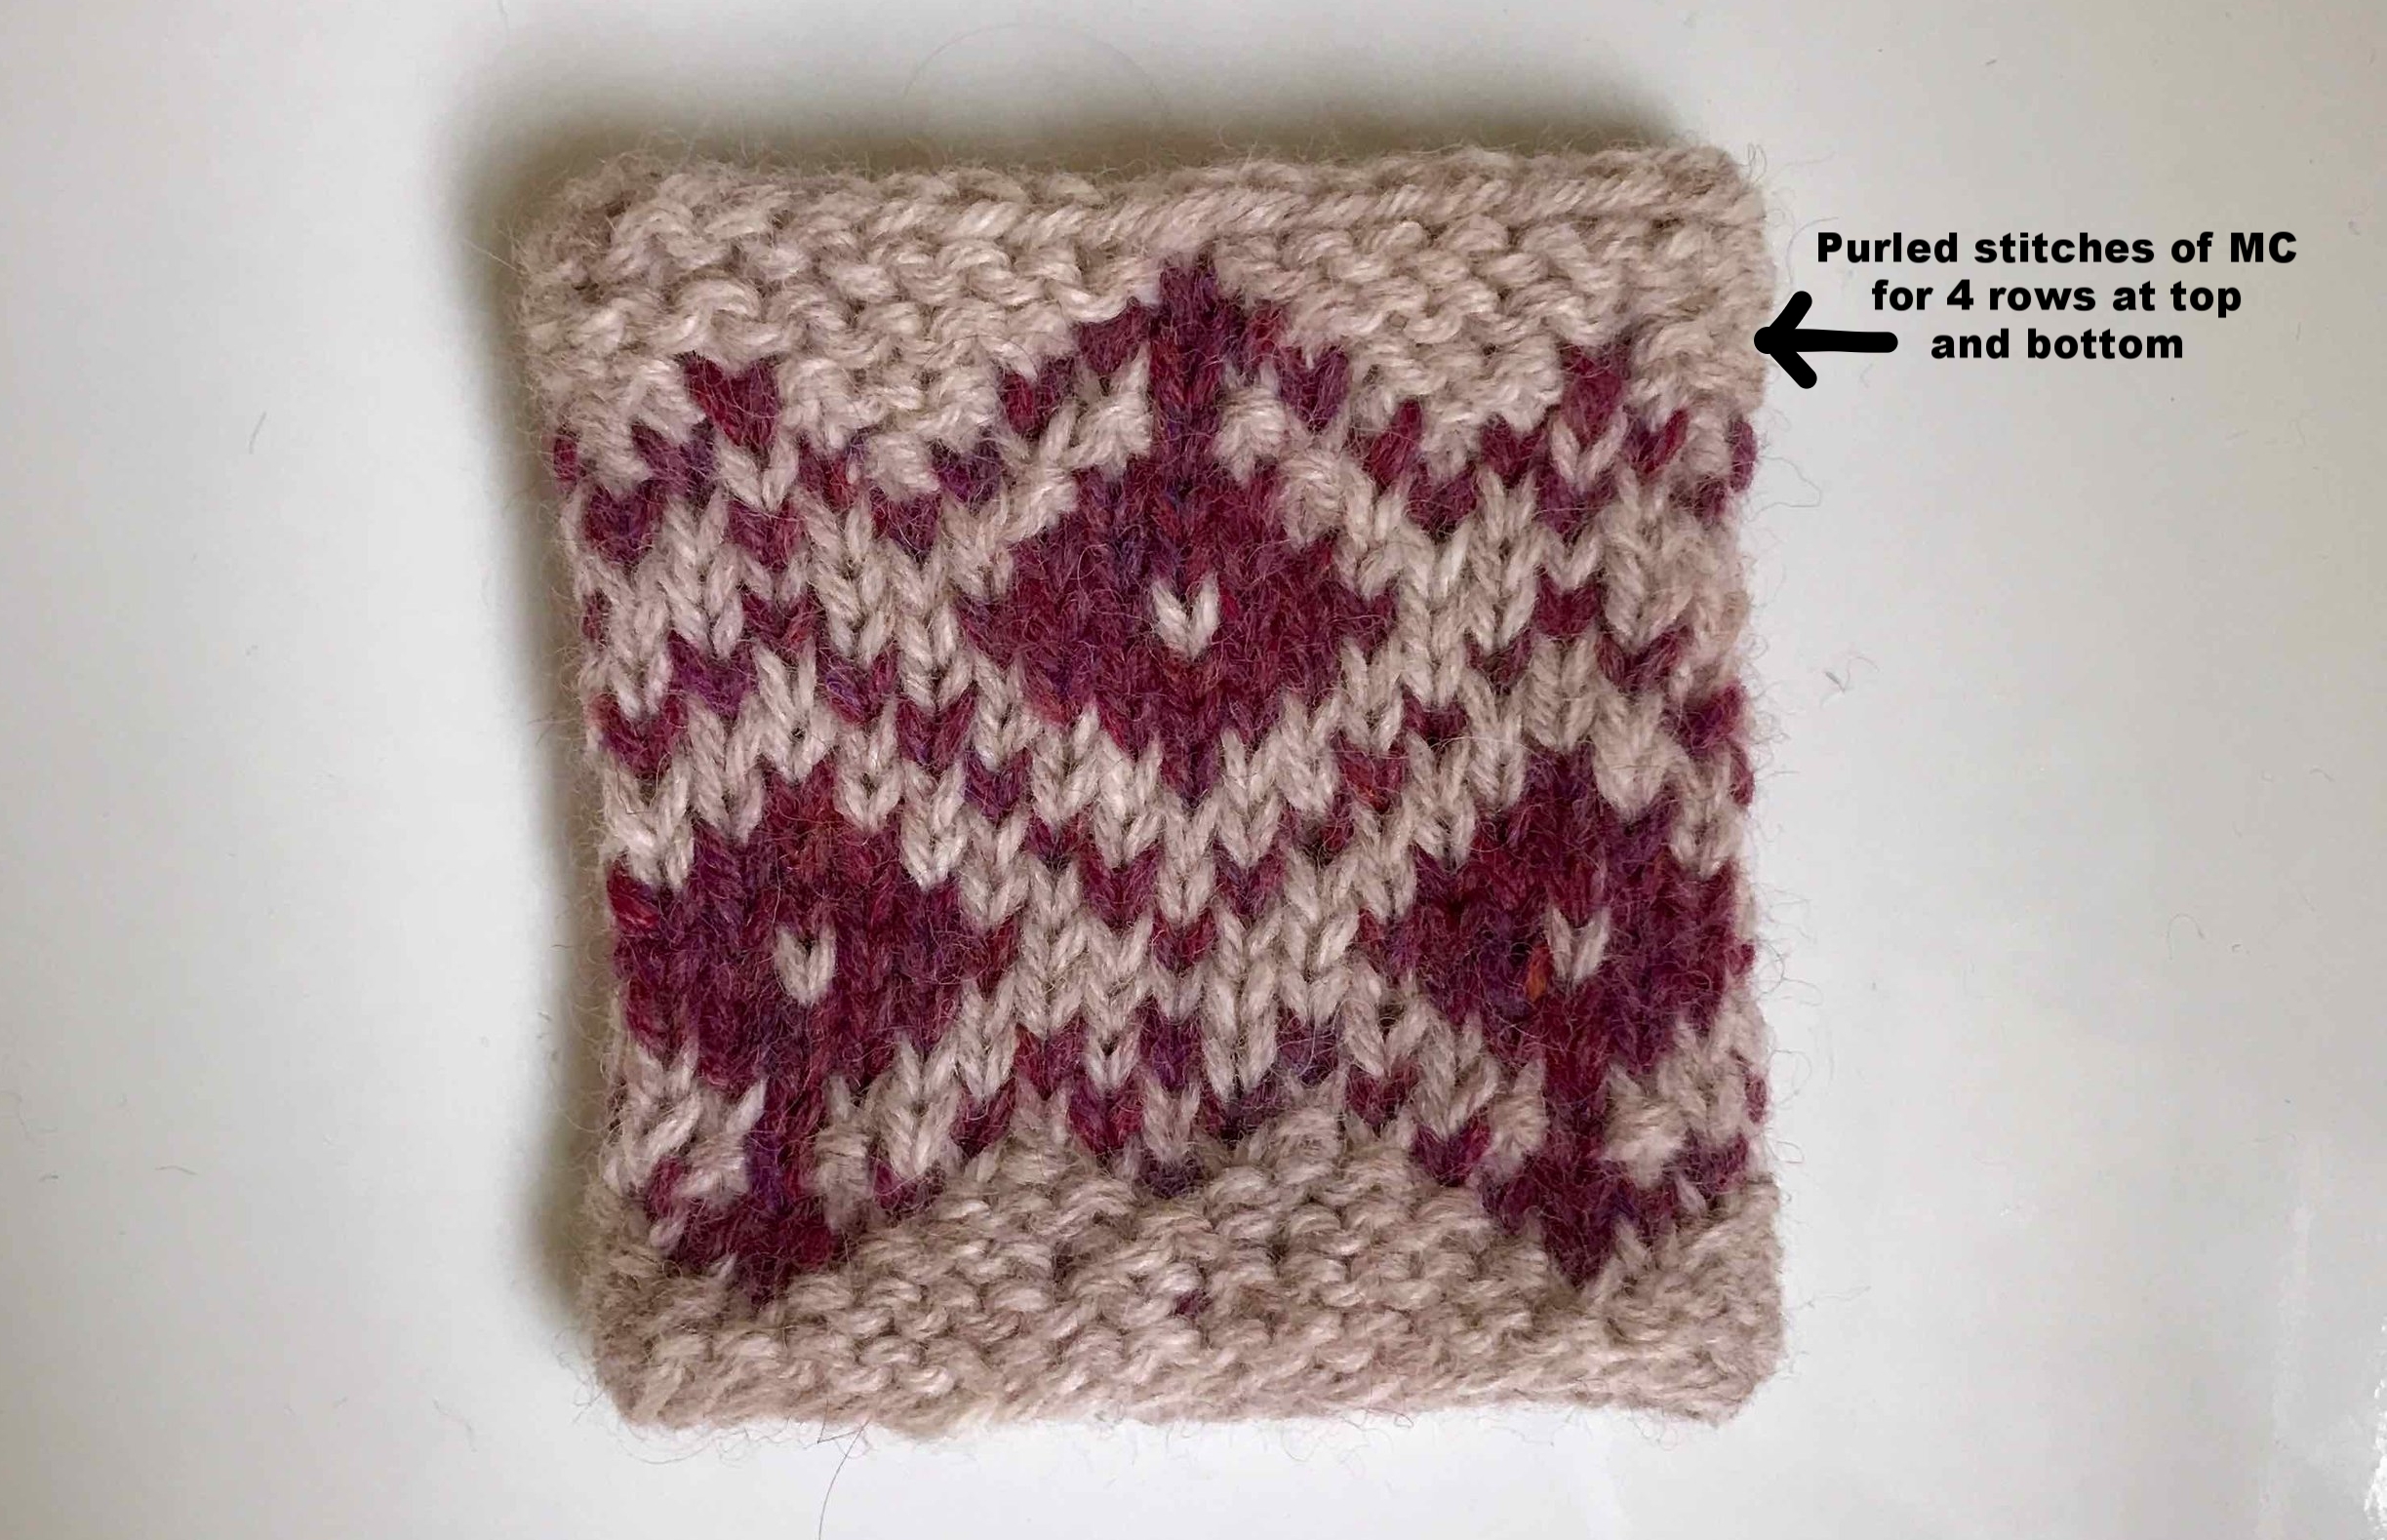
Purl When You Can (PWYC) is a technique to work stranded colourwork from the cast on edge without having to make a cuff. When working in stocking stitch, a cuff is normally added to the top and bottom edges to ensure the edges do not curl when finished. 

Meg Swansen introduced this technique and it is very useful for when you want the colourwork pattern to reach the edges of the knitting. I have used it in my Caffeic pattern and in the Neck and Neck! MKAL pattern.

The basic technique involves when working into as stitch of the same colour, purl it instead of knitting. If working into a contrasting colour stitch then knit it as usual. This only needs to be done in the first (or last) four or five rounds. The purl stitches act like ribbing does to prevent curling, but in a much less regular pattern than ribbing.


IMG_7928.jpg


Tip - Avoid a Jog in Colourwork when Knitting in the Round

 This tip is courtesy of Meg Swansen, Elizabeth Zimmerman's daughter.

On a single round of color (say, when alternating single rounds of 2 colors) - when you finish one round and are starting the next round in the 2nd color, make sure to bring the new color strand over the old color (instead of under it) when knitting the first stitch.

When alternating stripes that are 2, 3, or more rounds thick: Knit the first round of the new color in its entirety, and when you go to knit the first stitch of the next round, pick up the stitch of the row below (which is in the old color), put it on the left needle, and k2tog. Now knit on in the new color. The first stitch of the round is now moved one stitch to the left (if you are marking the first stitch, move your marker one to the left).

Saturday, August 20, 2022

Technique - Ladderback Jacquard

Catching floats using the Fair Isle method (wrapping the working yarn with the float) can sometimes show through, esp where the colours are highly contrasting.

Ladderback jacquard is used to manage long floats invisibly. You can choose to not use it when the floats are smaller and then use it when they're longer, just stop and start as many ladders as you need. Use ladderback jacquard every every 5 or 6 stitches. It can be used to work intarsia in the round. 

A ladder can be added at the beginning of the colourwork or part way through; mark them with a stitch marker if desired.

Ladderback jacquard involves increasing a stitch using the carried yarn = the first stitch of the ladder, and then purling that stitch in the carried yarn on subsequent rounds. This live ladder stitch will show on the right side of the work until it is no longer needed when it is simply knit together with the next stitch using the working yarn. The ladder stitch will fall to the back of the work.   

Add the first ladder stitch using a lifted increase (with the right needle point lift the right leg of the stitch below on the left needle and place it on the left needle). It is very important that the working yarn is brought to the front of the work before increasing. This prevents the ladder from showing through to the right side of the work.

As with all floats, the work should be loose.

Technique:

  1. At the stitch where you will add the ladder, bring both the working yarn the and carried yarn to the front of the work then do a lifted increase.
  2. Knit through the right leg of the lifted stitch with the carried yarn then move both yarns to the back and continue knitting
  3. On subsequent rounds, purl the ladder stitch with the carried yarn
  4. When you no longer want the ladder, knit the ladder stitch together with the next stitch in the working yarn

Technique - Add a Frill Edging

This frill can be added either at the end of knitting a sleeve (by increasing) or the beginning of a sleeve (by decreasing), and either flat or in the round.

Here, the example is at the end of knitting a sleeve, knit in the round. Use a needle that is a full size smaller than the one you've been knitting the sleeve with. Note that the depth of the frill can be adjusted by decreasing at a lower rate over more rows. Knit the frill quite tightly to stop it looking sloppy.

Technique:

  1.  In the next row, double the number of stitches eg 50 to 100 by increasing every second stitch
  2. In the next row, double the number of stitches eg 100 to 200 by increasing every second stitch
Here, the example is at the beginning of knitting a sleeve, knit in the round. 

Technique:

  1. Cast on 4 x the number of stitches that the first row of the sleeve requires. eg if the sleeve starts with 50 stitches, cast on 200.
  2. In the next row, decrease to half the number of stitches eg 200 to 100, by kniting 2 stitches then passing the first over the second. Knit a further 2 stitches then pass the first stitch over the second.
  3. In the next row, decrease to half the number of stitches again eg 100 to 50, by knitting two stitches together than the next two together, etc.

Friday, August 19, 2022

Adjusting Size or Style According to Gauge

Use the maths below to draw a schematic and then adjust this to get the size or style you want. eg a higher neckline.

 Stitch Gauge

Number of stitches per 10cm / 10 = stitches per cm

Row Gauge

Number of rows per 10cm /10 = rows per cm

Width of piece

Number of stitches /stitch gauge = width of piece

Length of piece

Number of rows / row gauge = length of piece

Number of Stitches

Width of piece x stitch gauge = number of stitches

Number of Rows

Length of piece x row gauge = number of rows


Friday, August 12, 2022

Technique - Collar Band on a Jumper

This technique is courtesy of Andrea Doig from Fruity Knitting (Ep 37).  She used it on her Manzanita Tee jumper by Romy Hill. It is used for a top-down jumper where the neck is cast-on using a Provisional cast-on.

Technique:

  1. Pick up the stitches from the Privisional cast-on onto a circular needle
  2. Turn your work inside out and knit a stocking stitch band from the wrong side that is twice the height of the finished collar eg 10cm

???

Technique - Picot Hem

 This technique is courtesy of Andrea Doig from Fruity Knitting (Ep 37).  She used it on her Manzanita Tee jumper by Romy Hill.

It is great for dressier garments and can be added to either bottom-up or top-down garments. Use it on hems and sleeve hems.

Here, the technique is described working from top-down.

Technique:

  1. Where you want the sleeve to end, where it will fold for the hem, knit a row of K2tog, yo to create a row of holes.
  2. Knit stocking stitch below this row for 1" and bind-off
  3. Turn the hem up along the row of holes
  4. Using the same yarn as for the jumper. whip stitch the bind-off stitches to the back loops of the jumper.


Thursday, August 11, 2022

Technique - Short Rows 7 Ways

 SHORT ROWS

1. Wrapless a.k.a. Simple Short Rows

The easiest way to knit short rows is the wrapless method: work to the turning point, turn your work, slip the first stitch and tighten yarn, and then work the rest of the row as you would normally. When you’re working over the short-row turn on the next row, tighten yarn again to avoid a hole forming in the fabric. Although this method is very easy to work, the drawback is that there’s inevitably a little slack on the working yarn at turning points, making not-so-invisible short rows. To avoid the issue, use one of the short-row methods below.

2. Wrap & Turn

Wrap-and-turn short rows are probably the most commonly used short-row technique. It was certainly the first short-row method I encountered and was taught. It involves wrapping the working yarn around the “neck” of the stitch on the other side of the short row, then picking up or concealing the wraps on the next row by knitting them together with the wrapped stitch.

3. Yarnover Method

The yarnover method is a variation of wrap-and-turn short rows. Instead of wrapping the working yarn around the stitch, work a backwards yarnover around the needle. On the return row, these two stitches are then worked together, just like in the wrap-and-turn method.

4. Japanese Short Rows

This one is pretty similar to wrapless short rows. After turning the work and slipping the first stitch, you place a removable marker — not on the stitch or around the needle — but on the working yarn, then work the rest of the row as you would normally. On the return row, work to where you placed the marker and pull the marker to create a loop on the back of the work. Place the loop on the left needle and knit together with the next stitch.

5. Sunday Short Rows

The next method is called the Sunday Short Rows not because you’re only supposed to use it on Sundays but because it was developed by knitwear designer Carol Sunday. The difference to Japanese short rows is that the first stitch after turning is not slipped.

6. German a.k.a the Double-Stitch Method

In German short rows, you slip the first stitch after turning with yarn in front, then pull the working yarn to turn the slipped stitch upside down so that both “legs” of the stitch are on the needle. This makes the doublestitch (because it looks like two stitches), frequently abbreviated as DS in knitting patterns. On the return row, work the doublestitch as one stitch, through both legs. This method has become my go-to way of knitting short rows. It’s easy to execute and nearly invisible. The only drawback I can think of is that you should never ever drop the doublestitch! It’s quite impossible to get it back correctly on the needle again. Believe me, I’ve tried.

7. Shadow Wraps a.k.a. Twin-Stitch Short Rows

The twin stitch may sound similar to double stitch but these methods are completely different from one another. In shadow wraps you’re actually making two stitches from one at the turning points. On the stockinette side of the work, make a lifted increase from the stitch below the next one, and place it back on the left needle. On the purl side, slip the first stitch, make a lifted increase below that stitch, then place them both back on the left needle. On the return row, work the twin stitch as one.


Sunday, August 7, 2022

Technique - Cables


Front or Back?

If you hold the resting stitches at the back, the cable turns to the right.  (This is easy to remember, think, “I’ll be right back!”)

If you hold the resting stitches to the front, the cable turns to the left. (“I’ll be left at the front door” is not so catchy, eh?)

How Many Stitches?

There are no rules or limits to the number of stitches over which you can work a cable. The tiniest ones, a two-stitch cable, have one stitch crossing over another.  

And you can have giant ones, crossing 8 or 10 or 12 stitches over another 8 or 10 or 12. 

EIGHT STITCHES CROSSING OVER EIGHT! (LOOKING ESPECIALLY CABLICIOUS IN MDK ATLAS)

The more stitches in the cable cross, the more the cable pulls the fabric in, which can make really great textured effects.

Tip: Generally, when we talk about a cable, the number we mention corresponds to the total number of stitches—both sides. So a 6-stitch cable is 3 stitches crossing over 3.

All of these samples show all the stitches in a cable being knit … some cable turns introduce purl stitches, for even more variations!

Working Cables

Top tips for working cables:

  • This might seem counter-intuitive, but I like to use a cable needle that is slightly larger than my knitting needle, so that it doesn’t slip out of the stitches while they’re waiting.
  • It’s important to make sure that your cable needle doesn’t twist around when it’s resting. That is, you want to knit them in the order you slipped them to the needle.  
  • There are many different shapes and styles of cable needles—straight ones, v-shaped ones, curved ones. Which you choose is entirely personal preference. Heck, in a push, you don’t even need a special tool—you can just as easily use a bobby pin or a golf tee!

  • My favorites are the white and blue ones in that photo, shaped like a shepherd’s crook. (You can see it in action in these photos, too.) I love this style for several reasons. Because one end is shorter than the other, it helps me keep the stitches in order. I always slip the stitches onto the short end, and then slide them down to the long end and knit off that. 

  • When the stitches are waiting, I move them along to the bend, and then the cable needle tucks nicely out of the way.
  • And when I’m not using it, I can tuck it in the neck of my t-shirt when I’m knitting, so I don’t lose it!
  • Most patterns use abbreviations for the cable “name”—for example, C6R—rather than spelling out the full instruction every time. Always consult the pattern glossary for the details; there’s no need to guess what the abbreviation means.

Technique: Adding a Button Band to a Cardigan

From Fruity Knitting, how to construct vertical buttonholes in a button band. Pick up stitches along the cardigan front and knit just less t...